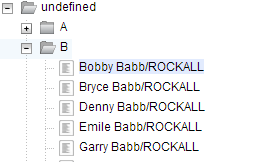
In this article I will describe how I converted this:
This
| This | in This |
 |
 |
note: for these series you will need a copy of the fakenames.nsf file.
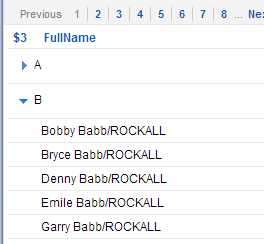
As we all know the default ViewPanel control is good for generic cases in where you want to translate the default notes charactaristics into a web application. One of the ‘features’ notes views offer are categories. And there is also the problem with ViewPanels. The HTML that is being produced by a viewPanel… It ain’t highly customizable and sometimes just a pain in the ##!@ to style. And ofcourse there is also the great feature that categories that are displayed in the last row of the page don’t show their children on the same page as the category when expanded!
Luckily for us (some people think otherwise) xPages is shipped with Dojo. This javascript framework offers lots and lots of default UI widgets ready to use. One problem tho. You need to know how to adapt them in xPages and the notes structure. One of them is the dijit.tree. A dijit.tree as the same already suggests renderes a Tree of categories and childnodes. Just like the ViewPanel but then highly customizable and and fairly easy to generate. I tried to implement a dijit.tree using notesview data from the Fakenames.nsf which contains 40.000 person documents and succeeded in less then 5 hours of code crunching. These series will be about this proces. So lets start.
First of all we need to know how we can create a dijit.tree by example. To do this you need to copy the following code in a xPage.
<script type="text/javascript">
// First we import the correct dojo / dijit packages
dojo.require("dojo.data.ItemFileReadStore");
dojo.require("dijit.Tree");
// Second we define an function which will be run after the page has been loaded
dojo.addOnLoad(function() {
// Create a data store to retrieve data from
// in this example we use the countries.json
var store = new dojo.data.ItemFileReadStore({
url: "countries.json"
});
// secondly we create a treeModel. A treemodel are the classes / datastructure
// on which the tree is running
var treeModel = new dijit.tree.ForestStoreModel({
store: store,
query: {
"type": "continent"
},
rootId: "root",
rootLabel: "Continents",
childrenAttrs: ["children"]
});
// Last but not least we create a new instance of our tree.
new dijit.Tree({
model: treeModel
},
"treeOne");
});
</script>
<!-- The domnode we will use to render the tree -->
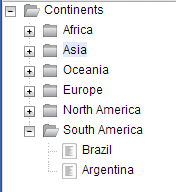
<div id="treeOne"/>Next step is to add the following file countries.json to your file resources in the nsf as countries.json. If you fire up your newly created xPage you will see that a dijit.tree has been created
As you can see with only a few lines of code we have created a great looking dijit tree. But how do we hook it up to an existing notesview? First of lets find out what the code does we just pasted. We will skip the dojo module loading ( dojo.require)
line 13 ~ 15:
A tree needs data to generate its tree from. On these lines we create a new variable in which we hold the filestore. This store is pointing to our countries.json file. But ofcourse this could also be an url / or a rest service! (hint)
19 ~ 27:
A dijit.Tree uses a treemodel to represents the actual data in the store. By adding / remove properties from the model we can influence how the data is being loaded and displayed. First we tell the model where to look for some data. In our case the local variabel store.
next we have to define the query which will be performed on the data. A query is nothing more then a statement that tells the model where to start expanding. Next are the rootId and rootLabel. These tell the model where to start and how to display the very first node in the data.
Last but not least the childrenattrs tells the model where to look for child nodes in the store.
30 ~ 33:
Here we really create the dijit.tree. In this object we specify on which dom node we want to treemodel to be generated.
Easy. Isn’t it. Now lets have a look at the data that is stored in the countries.json and compare it with json that is generated by a notesview by default.
items: [
	        { id: 'AF', name:'Africa', type:'continent', population:'900 million', area: '30,221,532 sq km',
	        		timezone: '-1 UTC to +4 UTC',
	        		children:[{ id: 'EG', name:'Egypt', type:'country' },
	        	{ id: 'KE', name:'Kenya', type:'country',
	        			children:[{_reference:'Nairobi'}, {_reference:'Mombasa'}] },
	        		{ id: 'Nairobi', name:'Nairobi', type:'city' },
	        		{ id: 'Mombasa', name:'Mombasa', type:'city' },
	        	{ id: 'SD', name:'Sudan', type:'country',
	        			children:{_reference:'Khartoum'} },
	        		{ id: 'Khartoum', name:'Khartoum', type:'city' }] }
]
As you can see JSON contains an array called ‘items’. Which contains a node with id, name, type etc as its properties. Every node contains a Children array if there are any children. Very straightforward and easy to read.
Now lets take a look at the JSON notes gives us when we open a random view
{
"@timestamp": "20130610T205348,20Z",
"@toplevelentries": "26",
"viewentry": [
{
"@position": "1",
"@noteid": "8000013C",
"@children": "1277",
"@descendants": "1277",
"@siblings": "26",
"entrydata": [
{
"@columnnumber": "0",
"@name": "$3",
"@category": "true",
"text": {
"0": "A"
}
},
{
"@columnnumber": "1",
"@name": "InView",
"number": {
"0": "1277"
}
},
{
"@columnnumber": "2",
"@name": "FullName",
"text": {
"0": ""
}
},
{
"@columnnumber": "3",
"@name": "LastName",
"text": {
"0": ""
}
},
{
"@columnnumber": "4",
"@name": "FirstName",
"text": {
"0": ""
}
}
]
},
{
"@position": "1.1",
"@unid": "B933790B1DC265ED8025725800728CC5",
"@noteid": "1D612",
"@siblings": "1277",
"entrydata": [
{
"@columnnumber": "1",
"@name": "InView",
"number": {
"0": "1"
}
},
{
"@columnnumber": "2",
"@name": "FullName",
"text": {
"0": "Adam Aaron/ROCKALL"
}
},
{
"@columnnumber": "3",
"@name": "LastName",
"text": {
"0": "Aaron"
}
},
{
"@columnnumber": "4",
"@name": "FirstName",
"text": {
"0": "Adam"
}
}
]
},
{
"@position": "1.2",
"@unid": "9D93E80306A7AA88802572580072717A",
"@noteid": "191AA",
"@siblings": "1277",
"entrydata": [
{
"@columnnumber": "1",
"@name": "InView",
"number": {
"0": "1"
}
},
{
"@columnnumber": "2",
"@name": "FullName",
"text": {
"0": "Dave Aaron/ROCKALL"
}
},
{
"@columnnumber": "3",
"@name": "LastName",
"text": {
"0": "Aaron"
}
},
{
"@columnnumber": "4",
"@name": "FirstName",
"text": {
"0": "Dave"
}
}
]
},
{
"@position": "1.3",
"@unid": "FAFA753960DB587A80257258007287CF",
"@noteid": "2776A",
"@siblings": "1277",
"entrydata": [
{
"@columnnumber": "1",
"@name": "InView",
"number": {
"0": "1"
}
},
{
"@columnnumber": "2",
"@name": "FullName",
"text": {
"0": "Donnie Aaron/ROCKALL"
}
},
{
"@columnnumber": "3",
"@name": "LastName",
"text": {
"0": "Aaron"
}
},
{
"@columnnumber": "4",
"@name": "FirstName",
"text": {
"0": "Donnie"
}
}
]
},
{
"@position": "1.4",
"@unid": "3A408A7EFED21FBA8025725800727468",
"@noteid": "9ABA",
"@siblings": "1277",
"entrydata": [
{
"@columnnumber": "1",
"@name": "InView",
"number": {
"0": "1"
}
},
{
"@columnnumber": "2",
"@name": "FullName",
"text": {
"0": "Glen Aaron/ROCKALL"
}
},
{
"@columnnumber": "3",
"@name": "LastName",
"text": {
"0": "Aaron"
}
},
{
"@columnnumber": "4",
"@name": "FirstName",
"text": {
"0": "Glen"
}
}
]
},
Well, I dont know about you but I think the first example is much easier to read then the notes way of doing things. So now we need to find a way to get the view to render the JSON just as we want it to be rendered.
Because I wanted to know more about the Rest service and the use of beans in this extlib component I decided I wanted to populate the dijit.tree using this technique. If you want to know more on how I achieved this. Stay tuned for part 2.
can u easily get rid of the open/close fodler icons?
with the plus minus signs in front of them I think they are just sueprfluous.
I think you can, according to the documentation at least. It’s done by overriding a method which retrieves the styleClass for a node: More info here: http://dojotoolkit.org/reference-guide/1.7/dijit/Tree.html#id5
I think i’ll add this info to the last part of the series. 🙂